Creating an Incremental Refresh Policy in Power BI for Analytics Views Containing Historical Data
If you are using azure DevOps Analytics Views (AV) to create Power BI reports and dashboards, you might have encountered some challenges with the size and performance of your datasets. Azure DevOps analytics views provide a rich and comprehensive source of historical work item data, but they also return a large amount of rows and columns that can quickly exceed the Power BI service limits and affect the refresh time and user experience of your reports.
In this blog post, I will explain why you should implement an incremental refresh policy in the Power BI service to manage the large dataset returned from the Azure DevOps AVs and how to do it step by step.
Historical Work Item Data in an Analytics View
Azure DevOps (ADO) work item’s history is the data that reflects how the state and values of a work item changed over time. For example, you can use analytics views to track how the priority, severity, or assigned to fields of a bug changed from the day it was created until the day it was closed.
Analytics views store historical work item data in a snapshot-based model. This means that for each work item, there is a copy of the entire work item for each day that the work item existed. For example, if a work item was created on January 1st and closed on January 31st, there will be 31 copies of the work item in the analytics view, one for each day in January. Each copy will have the same work item ID, but different values for the fields that changed over time. The analytics view also includes a special field called RevisionDate, which indicates the date of the snapshot.
When configuring the AV, any option besides the Current Only radio button will return historical work item data. Selecting the Granularity option of Daily allows you to create reports that track the number of days a work item is in a particular state and track changes at the daily level.
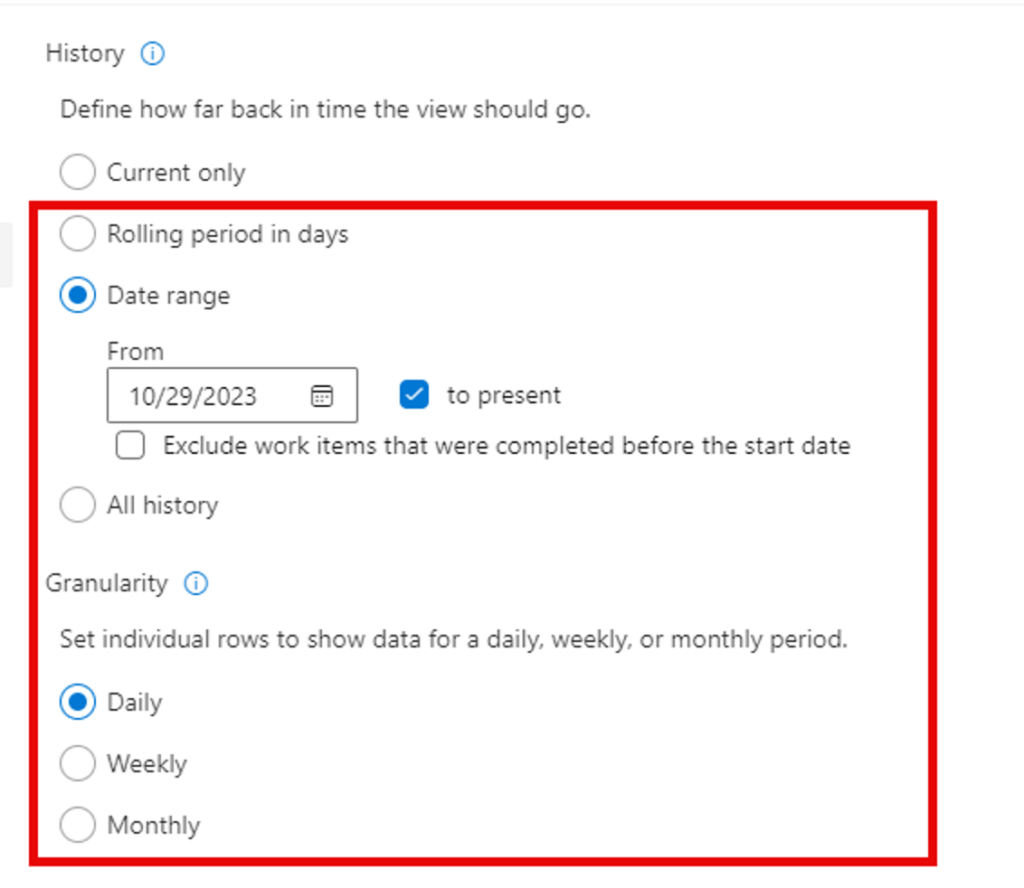
The snapshot-based model of analytics views enables you to perform complex historical analysis and trending over time, but it also results in a large dataset that grows exponentially as the number of work items and the duration of the project increase. For example, if you have 10,000 work items in your project and you want to query the last 12 months of data, the analytics view will return 10,000 x 365 = 3.65 million rows. If you want to query the last 5 years of data, the analytics view will return 10,000 x 1825 = 18.25 million rows. This can easily exceed the Power BI service limits, which are 1 GB per dataset and 10 GB per workspace, and affect the performance and usability of your reports and dashboards.
Limit the Historical Data when Building the Report
It is advisable to use a very small number of days when you generate the report from the Work Item’s historical data. Choose a Rolling Period of Days that is < 7 days or a Date Range that is a week. This makes the download time of the historical data from the ADO AV faster and lets you start the data model creation and the report development process. Otherwise, it can take a long time and slow down the report building process if you get hundreds of thousands or millions of rows.
You will change these values once the report is published into the Power BI service.
What is the Power BI Incremental Refresh Policy
Incremental refresh allows you to load only the new or updated data into your dataset after the previous loading cycle has completed. Instead of refreshing the entire dataset, it focuses on the specific data partitions that have changed. This feature is especially useful for tables with data that frequently updates, such as transactional data.
Incremental refresh works by partitioning the data within the dataset. Each partition represents a time slice. Only the data in the most recent partition is refreshed once it has been imported into the dataset.
In Power BI Desktop, you configure two parameters: RangeStart and RangeEnd. These parameters filter the data loaded into the model based on date/time.
When you publish a Power BI Desktop model to the service, the service automatically creates incremental refresh and historical partitions for each table. These partitions separate frequently refreshed data from less frequent data.
Benefits of Incremental Refresh:
- Fewer Refresh Cycles: Fast-changing data requires fewer refresh cycles.
- Faster Refreshes: Only the most recent data changes are refreshed.
- Reliability: No need for long-running connections to volatile data sources.
- Reduced Resource Consumption: Less data to refresh means lower memory and resource usage.
- Large Models: Semantic models with potentially billions of rows can grow without full refreshes.
Review this Power BI help file to understand the incremental refresh process in the Power BI service. This Power BI help file describes how to setup incremental refresh on the dataset using parameters. The steps outlined in the aforementioned help files are adapted to use with analytic views in Azure DevOps.
NOTE: Incremental refresh is supported for Power BI Premium, Premium per user, Power BI Pro, and Power BI Embedded model.
Implementation Process
Analytics View Configuration
The historical AVs uses the Date field to indicate the date in which the work item is created. This field is automatically added to the AV and is not visible through UI as selectable fields for the AV. This process uses the Date field to implement the incremental refresh process.
Create the AV and set either the date period or the Rolling period in days to a low number, such as 7 days.

Follow the steps in this blog post to connect the AV to the Power BI report.
Power BI Report Parameters and Configuration
In Power BI desktop, select the Transform Data button on the menu bar. This opens the Power Query editor.
Duplicate the Date field by right clicking on the field and select Duplicate Column.
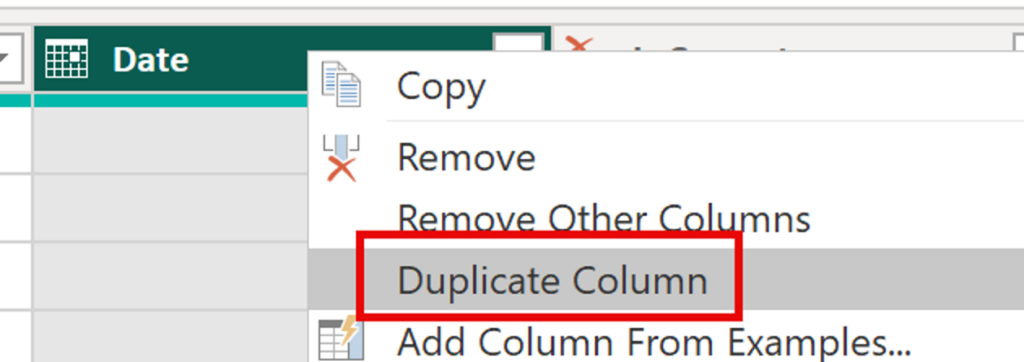
Right click in the new Date field and select Rename. Rename the column to Date-ICR (or anything you want).
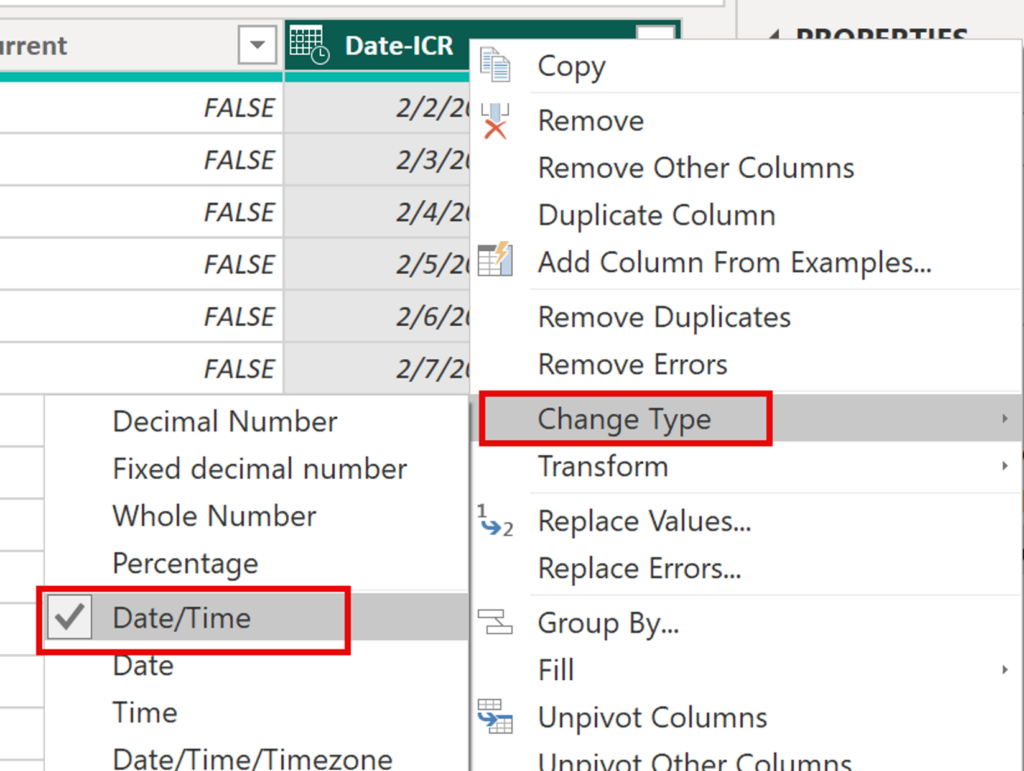
Change the date type from Date to Date/Time on the new Date-ICR column. This column is used in the incremental refresh policy.
Parameters
The incremental refresh process requires two parameters in the Power BI data model.
Select Manage Parameters -> New Parameter.

Create the RangeStart parameter with a date value in the past. This is used on the initial refresh of the data in Power BI desktop. The value is overwritten based on the number of years (or months) selected in the incremental refresh policy when the dataset is refreshed in the Power BI service. To optimize performance, keep the RangeStart value to only a few months back. This helps minimize the initial load of data in Power BI Desktop.
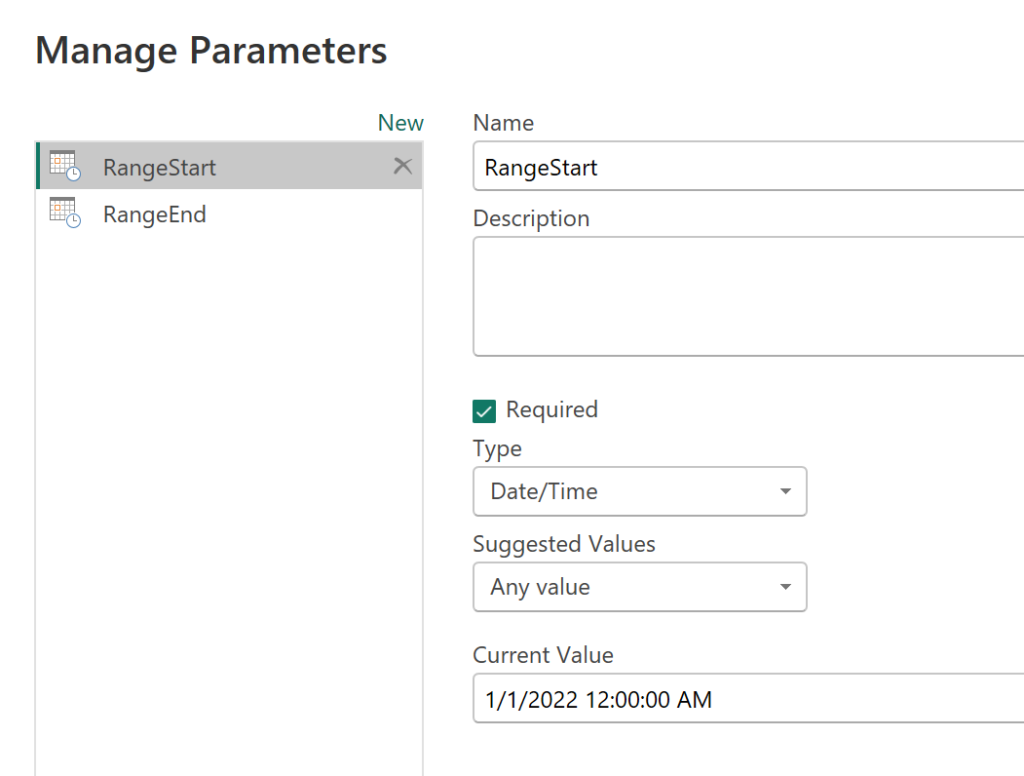
Create the RangeEnd parameter with a date value in the future. Again, this value is overwritten after the incremental refresh policy is enabled in Power BI Service.

Filter the new Date-ICR Columns
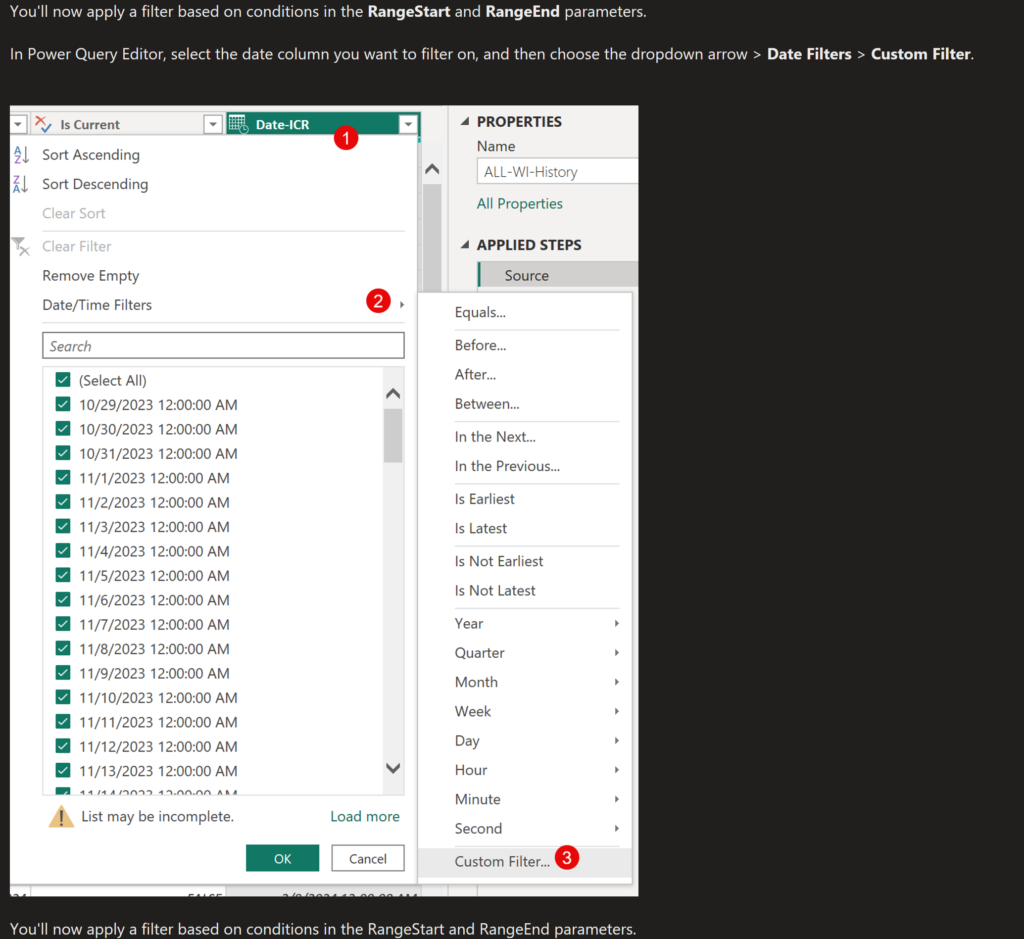
You’ll now apply a filter based on conditions in the RangeStart and RangeEnd parameters.
In Power Query Editor, select the date column you want to filter on, and then choose the dropdown arrow > Date Filters > Custom Filter.
In Filter Rows, to specify the first condition, select is after or equal to, then choose Parameter, and then choose RangeStart. Select the drop down in the yellow box to see the parameters.
The second option in the filter requires the is before or equal to option. Choose Parameter, and then choose RangeEnd.
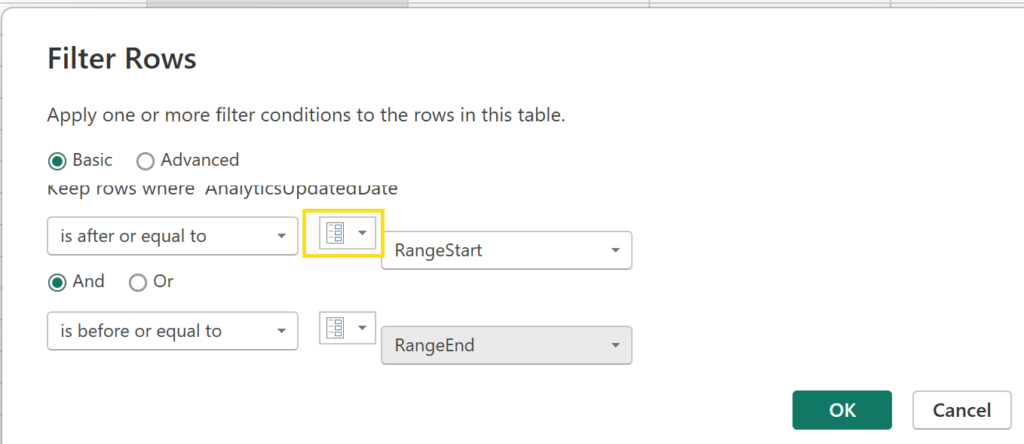
Select OK to close the dialog.
Select Close and Apply.
Define the Incremental Refresh Policy
After you’ve defined RangeStart and RangeEnd parameters, and filtered data based on those parameters, you’ll define an incremental refresh policy. This policy is applied only after the model is published to the service, and a manual or scheduled refresh operation is performed.
The incremental refresh policy is defined per analytics view. If your report has multiple analytics views, then each one will have its own refresh policy established.
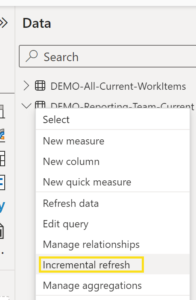
Select the table with the analytics view data in the Data view, right-click a table in the Data pane and select Incremental refresh.
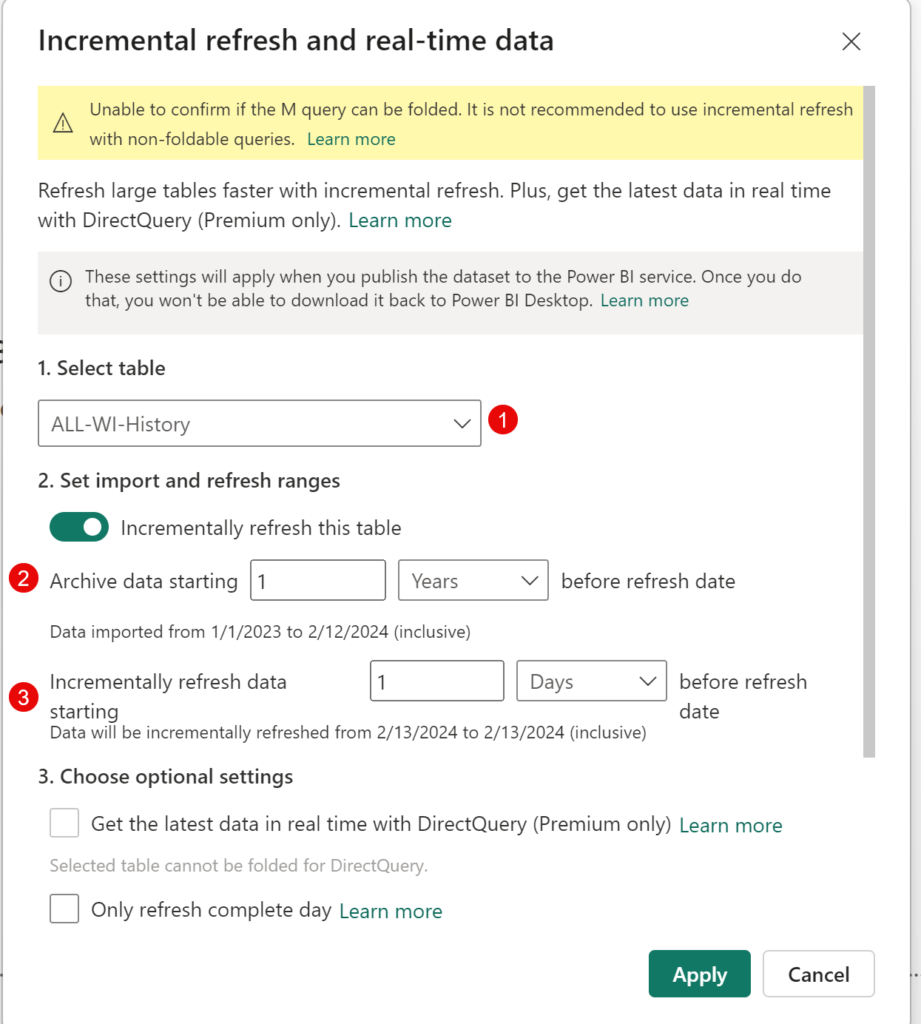
Specify required settings:
If the table with the analytics view data is not selected in the 1. Select Table section, then select it from the drop down.
In the 2. Set import and refresh ranges section, move the slider to On. If the slider is disabled, it means the Power Query expression for the table doesn’t include a filter based on the RangeStart and RangeEnd parameters.
In Archive data starting, specify the historical store period you want to include in the model. All rows with dates in this period will be loaded into the model in the service, unless other filters apply.
In Incrementally refresh data starting, specify the refresh period. All rows with dates in this period will be refreshed in the model each time a manual or scheduled refresh operation is performed by the Power BI service.
Keep the amount of data to load from the analytics view in perspective. You probably don’t need more than a year or two of data on the current work items. If you need more, then explore creating aggregation ODATA queries to summarize the data.
NOTE: The yellow banner will appear indicating the M query cannot be folded. This is to be expected and can be disregarded.
Publish the Report
Now that your RangeStart and RangeEnd parameters, filtering, and refresh policy settings are complete, save your report, and publish to the Power BI service.
The Power BI Service Configuration
Schedule the Power BI Data Model Refresh
Open a browser and navigate to the Power BI service and select the published semantic model. Go into the semantic model’s settings and add the times during the day to refresh the model that makes sense for your business needs.

Update the Analytics View’s Number of Days in History
If you had followed the steps to minimize the number of days for the AV’s history during the development of the report, now is the time to adjust the value to meet your reporting needs.
Open the AV for edit. Change either the Date Range or the Rolling Number of Days to an appropriate value.
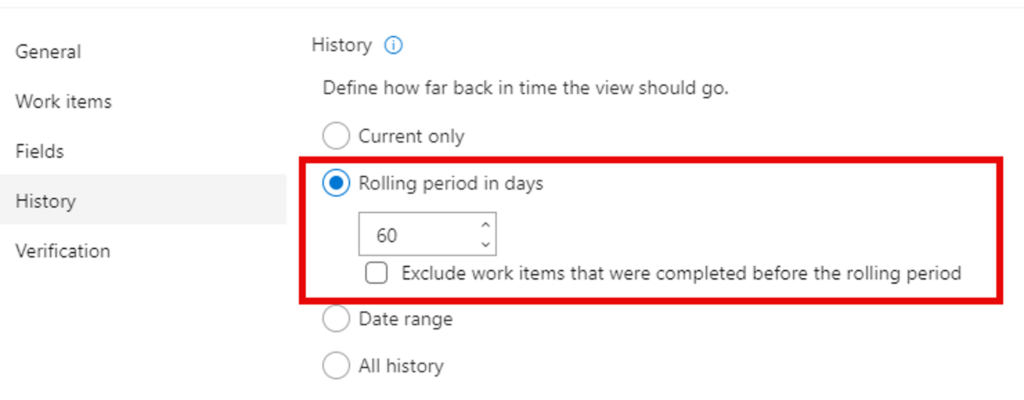
NOTE: Do not set the number of days of history too far back. This will cause your report refreshes to time out or be throttled by Microsoft. Set filters in the AV to narrow down the result set and keep the number of days of history to a reasonable number.
The next refresh of the AV retrieves the number of days set in the AV’s History tab. For this example, the AV now returns the past 60 days from today’s date. With incremental refresh set, the semantic model will keep the days greater than 60. Each days’ worth of history is appended to the semantic model.
Depending on the amount of data, this refresh can take quite a while. Subsequent refreshes, whether manual or scheduled, are typically much faster because the incremental refresh policy is applied and only for the period specified in the refresh policy setting is refreshed.
Check out this blog post for confirming the incremental refresh is working.
Finie!