A guide to securely and efficiently connect the Power BI Service to SQL Server with a service principal.
A service principal is useful for accessing SQL Server from the Power BI Service as it is an identity that represents an application or a service in Azure Active Directory (AAD). Unlike a user account, a service principal does not have a username or password, but rather a set of credentials such as a client ID and a secret, or a certificate. Using a service principal, you can authenticate and authorize your application or service to access various Azure resources, such as SQL Server, without requiring a user to sign in. This blog post goes over the steps to connect Power BI Services to SQL Server with a Service Principal.
Connecting the Power BI semantic model to SQL Server using a service principal has several benefits, such as:
- It enables you to use the same identity for multiple data sources, simplifying the management and security of your connections.
- It allows you to grant granular permissions to the service principal, following the principle of least privilege, and avoid exposing sensitive credentials.
- It supports seamless refresh of your datasets in the Power BI service, without requiring user intervention or storing credentials in the cloud.
This blog post shows you how to create and configure a service principal and use it to connect to SQL Server from the Power BI service for a semantic model.
High Level Steps
To implement a service principal to access SQL Server from the Power BI Service, you need to follow these steps:
– Create a service principal in AAD and assign it a role.
– Configure your SQL Server to accept connections from the service principal and grant it the appropriate permissions on the database or schema level.
– Publish your report to the Power BI Service and configure the dataset settings to use the service principal for authentication.
– Schedule a refresh or trigger a manual refresh to verify that your report can access the data source with the service principal.
Implementation:
Register Application in Azure:
Sign in to the Azure portal (https://portal.azure.com) with your Azure account credentials.
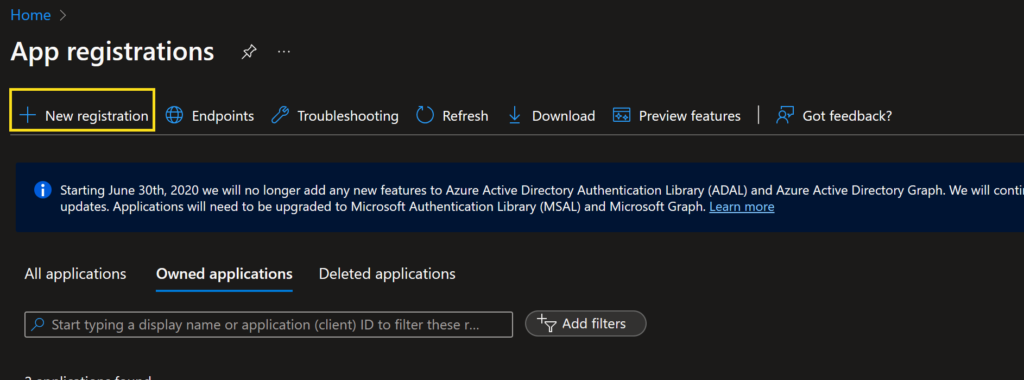
Navigate to the App Registration service.
Click on New registration to create a new application registration

Provide a name for your service principal and select the appropriate account type. For example, you can choose between Accounts in this organizational directory only or Accounts in any organizational directory.

Under the Certificates & Secrets section, create a new client secret, and securely store the generated value for later use. Remember that, the secret value will be shown only once after that it will be hidden. If you forgot or lost the secret value, then you have to generate the new one.
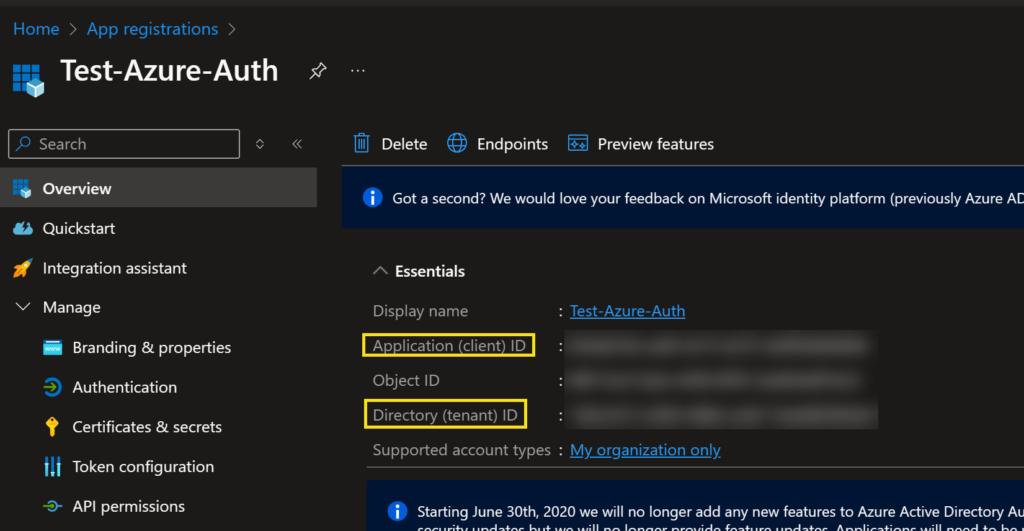
NOTE: You will need the Client ID, Tenant ID, and the Secret value copied to Notepad or directly into SSMS for the next step.
SQL Login Creation
Open SSMS and connect to the Azure SQL Server.
Connect to the Master database.
Run the following SQL commands to create the login and add a user account. Change the [Test-Azure-Auth] to the name you want to use for the login and SQL account.
CREATE LOGIN [Test-Azure-Auth] FROM EXTERNAL PROVIDER;
GO

CREATE USER [Test-Azure-Auth] FOR LOGIN [Test-Azure-Auth] WITH DEFAULT_SCHEMA=[dbo]
GO
The following command sets up a login named “Test-Azure-Auth” that uses an external authentication provider. This means that the authentication is done by another system or service that manages the user authentication process. This kind of login lets users log in with external credentials, such as those from Entra ID, Active Directory Federation Services (ADFS), or other identity providers.
Note: The above query will help in solving the error from the Power BI Service when attempting to authenticate: Error 1: Exception calling “Open” with “0” argument(s): “Login failed for user ‘<token-identified principal>’.”
Switch to the User Database to add the Service Principal account:
CREATE USER [Test-Azure-Auth] FOR LOGIN [Test-Azure-Auth] WITH DEFAULT_SCHEMA=[dbo]
GO

EXEC sp_addrolemember 'db_datareader', 'Test-Azure-Auth';
GO
EXEC sp_addrolemember 'db_datawriter', 'Test-Azure-Auth';
GO

GRANT EXECUTE ON SCHEMA :: dbo TO [Test-Azure-Auth];
The first command sets up a user named “Test-Azure-Auth” in your database, based on the login “Test-Azure-Auth” that you created earlier. The user is linked to the login and enables the login to access and work with the objects in your database.
The second command assigns the user “Test-Azure-Auth” to the “db_datawriter” and “db_datareader” role in your database. The “db_datawriter” role is a predefined database role that gives the user the required permissions to write data to the database.
Power BI Services Authentication:
Publish the report to the Power BI workspace.
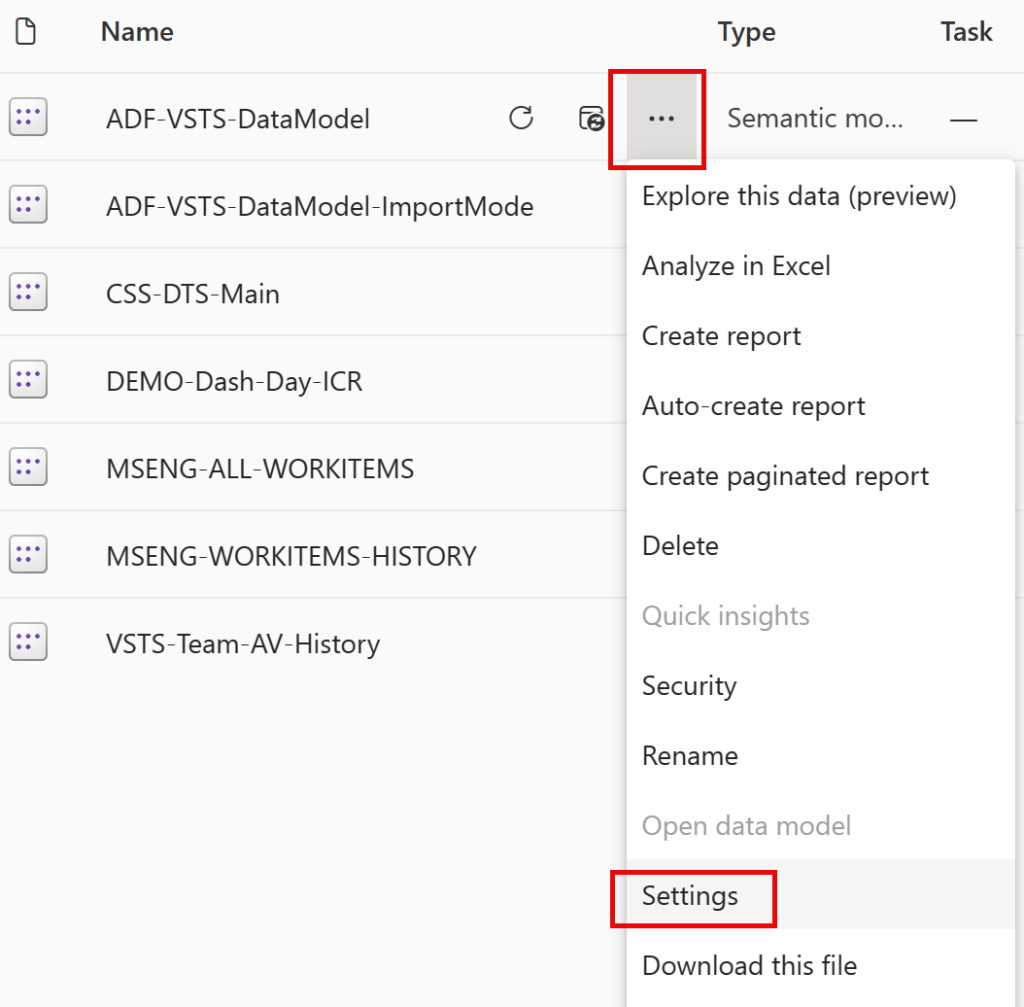
Select the Settings option for the published semantic model.

Expand the Data Source Credentials option and select Edit Credentials.
From the Authentication Method, select Service Principal.
Enter the Tenant ID, Service Principal ID, and the Secret and select Sign In.
Note: These are the same values used in the SQL scripts to setup the login.
Refresh the data to test the connection.
Fini!