Efficient Workflow for Writing ODATA Queries
The Azure DevOps documentation for writing ODATA queries and adding to the Power BI report advises you combine the ODATA query to a single line when adding to the Power BI report. This is not a good idea!
Instead, follow the steps in this blog post to simplify the process creating, testing, and debugging the queries. This blog post will show you efficient steps for creating and connecting the ODATA queries for extracting the data from ADO and adding to the Power BI report. These are best practices for writing efficient ODATA queries for Azure DevOps analytics data.
Tooling and Environment for Creating and Testing ODATA Queries
To begin writing ODATA queries, follow the steps in the Azure DevOps documentation to set up the VS Code extension and environment. The extension lets you run and debug the ODATA queries in VS Code.
Use a repo in ADO or GitHub to store your ODATA queries with version control. This can help you collaborate with others or keep track of your changes over time.
I recommend writing and testing the ODATA queries in VS Code or other editors before putting them in the Power BI report. It is much easier to find and fix errors in the query in VS Code than in the Power Query editor of Power BI.
Writing and Testing the ODATA Queries
ODATA Data Dictionary
Put this line at the start of each ODATA file you make. It shows the data dictionary for the ADO data model with this ODATA query. Replace {Organization} with the name of your Azure DevOps organization before running the query.
https://analytics.dev.azure.com/{Organization}/_odata/v4.0-preview/$metadataThis ODATA query provides the entities and fields for the ADO data model. If you add fields to the work item templates in ADO, run the query at the Team Project level. Else, run it at the ADO Organizational level.
Prevent Throttling
The following line is added to the ODATA query in the Power Query editor after the ODATA query is added to Power BI. It helps prevent throttling by the ADO service. There are situations where null values are preventing the results from being shown in the query.
[Implementation="2.0",OmitValues = ODataOmitValues.Nulls,ODataVersion = 4]The Case for Not Combing the ODATA Query to a Single Line
As mentioned in the intro paragraph, the Azure DevOps documentation states to combine the ODATA query to a single line for testing and adding to the Power BI report. The combine action adds encoding to the query to remove any spaces and to account for the different characters in the ODATA query.
The reason for not combining the query is because debugging it and making changes is very difficult after the lines are combined. For instance, the following query returns the list of ADO Team Projects for an organization.
https://analytics.dev.azure.com/mseng/_odata/v4.0-preview/Projects?
$select=ProjectName,ProjectID
When using the Combine action in VS Code -> Ctrl+Shift+P -> ODATA:Combine

The query is changed to the following and it is still easy to make modifications.
https://analytics.dev.azure.com/mseng/_odata/v4.0-preview/Projects?%24select=ProjectName%2CProjectIDHowever, once you create a true multiline query in ODATA, the combine action will make the query unreadable.
https://analytics.dev.azure.com/mseng/azuredevops/_odata/v4.0-preview/WorkItemSnapshot?%24filter=%28CreatedDate+ge+2023-06-21Z%29+&%24Top=100&%24select=WorkItemId%2CDateValue%2CTitle%2CWorkItemType%2CState%2CTagNames%2CRisk%2CSeverity%2CChangedDate%2CCreatedDate%2CPriority%2CReason%2C+BusinessValue%2CIssue%2CResolvedDate%2CEffort%2COriginalEstimate%2CRemainingWork%2CStoryPoints%2CTargetDate%2CResolvedDate%2CStateChangeDate%2CInProgressDate&%24expand=Teams%28%24select%3DTeamName%2CTeamSK%29%2CAssignedTo%28%24select%3DUserName%29%2CIteration%28%24select%3DIterationPath%2CIterationName%2CIterationSK%2CStartDate%2CEndDate%2CIsEnded%29%2CArea%28%24select%3DAreaPath%2CAreaSK%29Try figuring out where to make changes in that query!
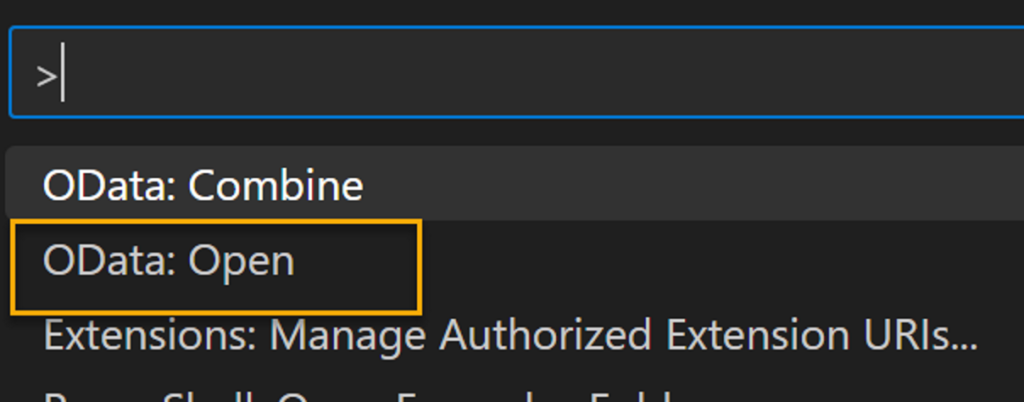
Instead, use the ODATA:Open command to test your query in VS Code. This keeps the original formatting and makes it easy to read the query and make changes.

Adding the ODATA Query to the Power BI Report
Yes, it is easier to combine the query to a single line to add to the ODATA Feed in the Power BI connector. You will pay for it later when a change is requested and you need to figure out where to make the change in the query!
When moving the ODATA query from VS Code to Power BI, add each line of the ODATA query to the ODATA Connector. Once added, the format is saved in the Power Query editor and easier to read and make changes.
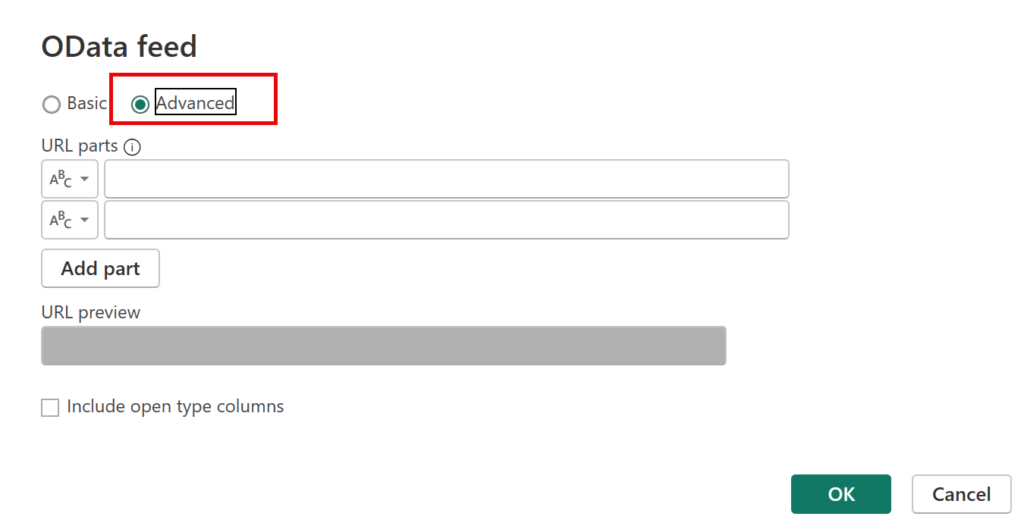
Select the ODATA Feed data connector in the Power BI report. Select the Advanced option to show the expanded rows.

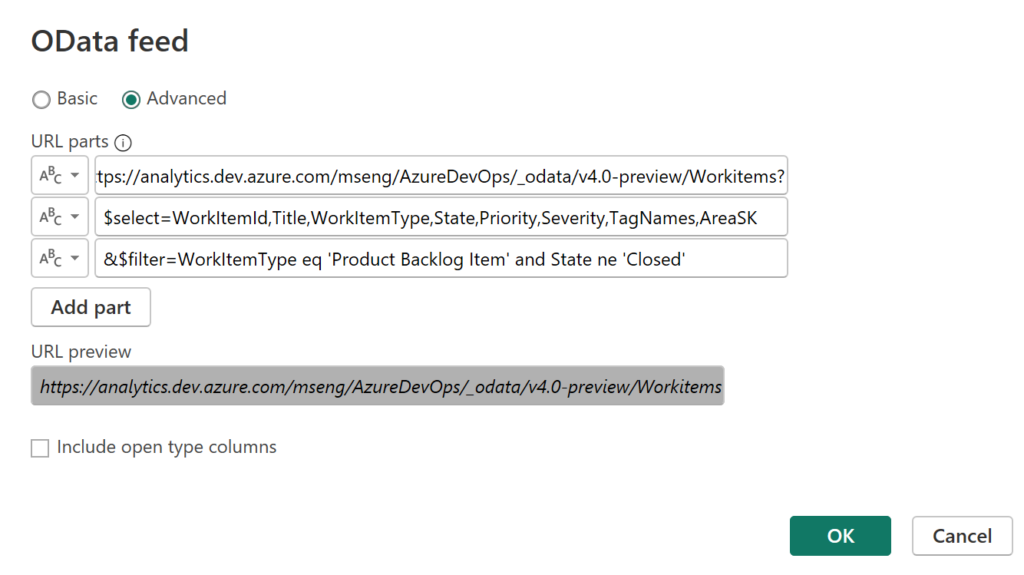
Copy the query line by line from VS Code to the ODATA Feed connector. Since the query runs correctly in VS Code, you should not encounter and issue when adding to the Power BI report.
NOTE: Only two lines appear by default. Select the Add Part button to additional lines.
Here is an ODATA query in VS Code that returns the top 5 Product Backlog Items that are not closed. It is always a good idea to limit the number of rows when testing. I will remove this limit when adding to the ODATA Feed Connector.
https://analytics.dev.azure.com/mseng/AzureDevOps/_odata/v4.0-preview/Workitems?
$select=WorkItemId,Title,WorkItemType,State,Priority,Severity,TagNames,AreaSK
&$filter=WorkItemType eq 'Product Backlog Item' and State ne 'Closed'
&$top=5
This is what the ODATA query looks like in the Power BI connector.

Select OK to load the query into the Power Query editor.
Formatting the ODATA Query in the Power Query Editor
The ODATA query appears as one line in the editor. Place your mouse pointer before each & and select Enter to move the query segment to the next line. This is for readability of the query.

By default, the Power Query editor does not add the recommended attributes to reduce throttling. Add the code listed below to the end of the query.
[Implementation="2.0",OmitValues = ODataOmitValues.Nulls,ODataVersion = 4]
I moved the segment to the next line in the Power Query editor for readablity for this blog posting.

Select Done and then Close and Apply to load the ODATA data.
Summary to Steps
Here is a listing of steps I use when creating and testing the ODATA queries before adding to the Power BI report:
- Create the query in VS Code
- Run the query Ctrl+Shift+P ODATA:Open
- Review the results in the browser
- Add or remove fields and clauses as needed until the query returns the data needed for the report
- Use the ODATA Feed connector and use the Advanced option
- Add each line from the ODATA query in VS Code as a separate line in the ODATA Feed connector
- Add the recommended ODATA clause to help query performance and reduce the chance of throttling.